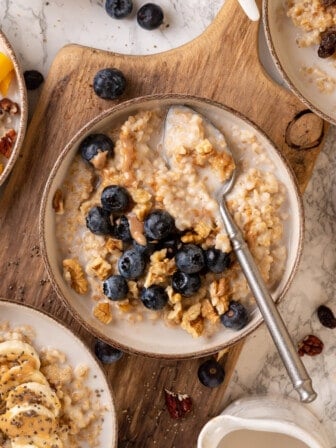
Jessiker Bakes | The Blog

Root Beer Float Cupcakes For Beer Month

Root Beer Float Cupcakes

This was my first taste of root beer, and consequently root beer float cupcakes.

There! I said it! And what have I been missing all these years?! The sweet caramel-y, smooth flavour, moistness and surprise filling  that made these root beer float cupcakes the best ever.

Root Beer Float Cupcakes

You heard me. I said best. ever. EVER. I love cupcakes, right. I love soft cupcakes. I die for moist cupcakes. And I go crazy for cupcakes with a surprise in the middle.

Root Beer Float Cupcakes

Hello? What did I just say? Everything that this cupcake is. I totally went on root beer overload. I used Jessica from How Sweet Eat’s Root Beer Float Cupcakes Recipe and went in. I added root beer into everything she didn’t have root beer in  and upped where she had root beer and I don’t regret it. When I say that the root beer made these cupcakes soft, I mean almost melt in your mouth soft, and definitely very delicate. But that doesn’t mean it wasn’t packed with flavour. The root beer flavour was something that’s hard to describe, but it’s slight caramel and slight fizz.

Yes, fizz.

The chocolate taste. It’s definitely there. Yet, it’s subtle, meaning it’s not overpowering but this is a chocolate cupcake that chocolate haters would love.

*Cough* Mr. Jessiker Bakes.

And the FROSTING! Exactly like ice cream, no doubt. I know I went overkill on eating these but when else will you get ice cream flavoured frosting? Root beer flavoured ice cream?

Okay, come on you have to try them now! I girly-fied them as you can see (well, duh) but they’re perfect for guys too.

Root Beer Float Cupcakes

I did these cupcakes for Beer Month by NY Foodgasm and here are the other gals who posted today!

Sophia of NY Foodgasm – Bluepoint Blueberry Muffins

Lauren of Hall Nesting – Beer Cheese Soup

Jenni of Pastry Chef Online – Double Chocolate Stout Cake with Vanilla Porter Toffee

Camille of Croque-Camille – Porter Chocolate Mousse

Root Beer Float Cupcakes

1. I used an apple corer to get the middles of the cupcakes out. It's so easy - then just push back down to cover back the holes once fillings are inside.

2. I used an ice cream scoop to scoop my frosting onto the cupcakes.

3. I also used a simple syrup over the cupcakes to keep them very moist - equal parts water and sugar boiled together then cooled, and added about 3 tablespoons of root beer.

4. These cupcakes last a very long time - I was impressed that days later they were still soft, moist and delicious.

5. Do NOT refrigerate these cupcakes. I made that mistake testing one and the frosting became rock hard and the cupcake dried out. While more simple syrup did help it, it's best to store them in an airtight container.

Ingredients:

  • 1 1/8 cups all purpose flour
  • 1/4 cup dark cocoa powder
  • 1 1/4 teaspoon baking soda
  • 1/2 teaspoon salt
  • 3/4 cup brown sugar
  • 1 egg
  • 1 teaspoon vanilla extract
  • 2 teaspoons root beer concentrate
  • 1/2 cup root beer
  • 1/2 cup + 1 tablespoon heavy cream
  • 1/2 cup butter, melted
  • 2 tablespoons sour cream
  • Vanilla Root Beer Frosting
  • 1 1/2 sticks butter, softened
  • 4 cups powdered sugar
  • 1 tablespoon vanilla extract
  • 2 tablespoons milk
  • 3 tablespoons root beer
  • 1/4 teaspoon root beer concentrate

Instructions:

  1. Preheat oven to 350 degrees.
  2. In a bowl, whisk egg and sugar until smooth and no lumps remain. Add cream, butter and vanilla, and mix until combined. Stir in sour cream.
  3. Sift dry ingredients together and add to wet mixture. Add root beer concentrate and root beer. Mix until batter is smooth.
  4. Line a muffin tin with liners and using a heaping 1/4 cup measure, add batter to each cup. Bake for 15-18 minutes. Let cool before frosting.
  5. Frosting
  6. In the bowl of an electric mixer, cream butter until smooth. On low speed, add powdered sugar one cup at a time, increasing speed to bring the frosting together. Add milk and vanilla extract. Beat until smooth. Add root beer concentrate and root beer.
  7. Once the cupcakes have completely cooled, fill each one with root beer frosting, then top with vanilla root beer frosting.

Share

Fluffy Vanilla Pancakes with Blueberry Sauce

Fluffy Vanilla Pancakes with Blueberry Sauce

Based on how busy this month has been for me, these Vanilla Pancakes with Blueberry Sauce were the perfect remedy for my stress. It’s almost coming up to exam time, and everything is about going non stop! I’m glad I actually had some time to stop and make these pancakes. They’re the sort of thing you won’t regret making, towers of fluffy pancakes with blueberry sauce cascading down.


Sounds perfect, doesn’t it?


I’ll admit it. I’m a pancake fiend. I’ve had pancakes for breakfast, lunch and dinner. What can I say? It’s what I do. But there’s something about these pancakes in particular that got to me. They’re the kind of pancakes you could eat without a topping, with the vanilla creating the right amount sweetness. I’m a fluffy pancake kind of girl, and after toying with this recipe from Joy the Baker, I reduced the amount of buttermilk because I realised it makes the pancakes fluffier. Plus I started using these pancake circles I bought ages ago that came in handy. Trust me, if you’re a pancake regular like me they take the stress out of making perfect circles. Just remember to spray them with cooking spray first!

Fluffy Vanilla Pancakes with Blueberry Sauce

The second reason I’m posting these pancakes is because I’ve been told I don’t post anything simple enough. Which is understandable; who is really going to get up and make Bird’s Nest Cupcakes casually? Sometimes it is a good idea to just step back and take in the simple joys of life. These pancakes are definitely of mine.


Whilst the blueberry sauce is completely optional, I go head over heels for it. It’s a great balance of sweet and fresh and blueberries are one of my favourite fruits. But, it’s okay to just do syrup. Don’t tell the blueberry sauce, but sometimes I simply do.

Fluffy Vanilla Pancakes with Blueberry Sauce

Fluffy Vanilla Pancakes with Blueberry Sauce

Ingredients:

    Pancakes
  • 1 cup flour, sifted
  • 1 Tablespoon sugar
  • 1 teaspoon baking powder
  • 1/2 teaspoon baking soda
  • 1/2 teaspoon salt
  • 1 teaspoon vanilla
  • 1 egg
  • 3/4 cup buttermilk
  • 2 tablespoons butter, melted and cooled
  • Blueberry Sauce via Martha Stewart
  • 1 1/2 pints (3 cups) blueberries
  • 3/4 cup sugar
  • 2 tablespoons unsalted butter
  • 2 tablespoons fresh lemon juice
  • 1 tablespoon cornstarch

Instructions:

  1. Optional: preheat oven to 200F degrees to keep cooked pancakes warm whilst others and being baked.
  2. In a large bowl, whisk together the egg, buttermilk, vanilla and butter. Add the flour, sugar, baking powder, baking soda and salt. Stir until just combined. The batter may be a bit lumpy.
  3. Heat a griddle pan or a cast iron skillet over medium to high heat. If you're using pancake circles like I did, spray them with cooking spray.
  4. Add a teaspoon of oil or a dab of butter and heat through or spray the griddle. Add 2 heaping tablespoons of batter to the pan or enough batter to fill half way up the pancake circles.
  5. Heat until bubbles form and start to pop.
  6. Carefully flip over and cook through.
  7. Place cooked pancakes on an oven proof plate and let rest in a 200 degree F oven while you fry the rest of the pancakes.
  8. Top pancakes with maple syrup or blueberry sauce sweetened with a dash of powdered sugar.
  9. Blueberry Topping
  10. Combine all ingredients in a saucepan over medium-high heat. Bring to a simmer, and cook until berries break down, about 4 minutes. Let cool, then refrigerate, covered, until cold (or up to 2 weeks).

Share

Black Velvet Baby Cakes for Beer Month(Guinness Cupcakes)

Black Velvet Baby Cakes (Guinness Cupcakes)

Today for the Beer Month I’m participating in put on my NY Foodgasm, I’m going to be sharing with you Black Velvet Baby Cakes. .

I thought these cupcakes were very significant regardless because these changed me from a beer hater to someone interested in beer…to having my first beer that I enjoyed! Now I can drink beer whenever or sometimes I only drink beer.


It’s a happening ending either way.

Confession: I’ve posted these before. I’d rather tell you now rather than you backtrack and find out. I didn’t have enough time to take pictures before the post and as I said to you guys in one of my recent posts, I’m going to stop rushing photos. Don’t worry, this probably won’t ever happen again unless it’s a Throwback Thursdays post.You’ll see that recipe later this month

Black Velvet Baby Cakes (Guinness Cupcakes)

There is something though, that beer does to cupcakes. That I don’t know why we haven’t tried them in regular cupcakes. It makes them the softest cupcakes you’ll ever have. I don’t mean gooey soft, I mean perfectly baked, very fluffy, and moist beyond belief. You need to try these cupcakes. And then there’s something very regal about these cupcakes. It does have that velvet-y smooth taste to it, the look of something only a king would eat.


Or a hungry queen.


I thank the maker of Guinness for these cupcakes. They have a slightly chocolatel-y but slightly not taste, and the beer itself shines in them. So don’t worry, if you’ve never had beer these are the perfect cupcakes to introduce you. You’re welcome.

Before we get to the recipe, here are the posts from the other ladies:
NY Foodgasm – Dos Equis Rice and Beans with Grilled Chipotle Chicken and Lime “Sour Cream”

Much Ado About Fooding – Miniature Guinness Cupcakes

Hall Nesting – Herbed Cheddar Stout Bread

Croque Camille – Beer Brioche

Beer Month – Black Velvet Baby Cakes (Guinness Cupcakes)

Black Velvet Baby Cakes by BBC Good Food

Ingredients:

  • 100g softened butter , plus extra for greasing
  • 175g light brown soft sugar
  • 1 egg
  • 100g self-raising flour
  • 50g ground almonds (I left these out)
  • ½ tsp baking soda
  • 5 tbsp cocoa , plus a little extra for decorating
  • 150ml Guinness
  • 200ml double cream
  • 25g icing sugar
  • splash Champagne (optional)

Instructions:

  1. Heat oven to 180 celcius/356 fahrenheit degrees. Line a cupcake pan with 10 liners.
  2. Put the butter, sugar, egg, flour, ground almonds, baking soda, cocoa and Guinness in a mixing bowl. Beat together until lump-free.
  3. Divide between the pans then bake for 20-25 mins.
  4. Cool for 15 mins then remove from pans and onto wire racks.
  5. Whip cream with the icing sugar and splash of Champagne, if using, until thick.
  6. Spoon a dollop onto the top of each cake and dust with a touch of cocoa. Serve with glasses of Champagne or Black Velvets for pudding.

Share

Cadbury Egg Easter Cupcakes


Cadbury Egg Cupcakes

Okay so I definitely disappeared for the last week, sorry! Things have been ridiculously busy and somehow an entire week just slipped by. Anyway to these Cadbury Egg Easter Cupcakes. Cadbury is actually my favourite type of chocolate, ever, more specifically the Milk Chocolate, then the Dark Chocolate. Ah, chocolate. Know what’s even better? Chocolate and Cupcakes. No wait, Chocolate Cupcakes with Cadbury inside! Cadbury Eggs! Yes, these cupcakes are quite the treat. Note they’re for sweet tooth lovers! I love how these Cadbury Eggs taste inside of the cupcakes and they’re the perfect surprise!


Cadbury Egg Cupcakes


I saw this lovely idea whilst browsing Pinterest which landed me on one of my favourite sites – Pizzazzerie by the lovely Courtney who posted this idea. I didn’t use her recipe but I definitely had to re use the cupcake surprise of the eggs in the middle. As I’ve said before a cupcake needs a little surprise! Exhibit A and Exhibit B here.

Cadbury Egg Cupcakes

Cadbury Egg Cupcakes


I topped mine with yellow cream cheese frosting because you know, spring, and yellow just seemed so bright and spring-like! These cupcakes are perfect for Easter – if you’re making them, let me know okay? I will be coming over.


Cadbury Egg Cupcakes

Cadbury Egg Easter Cupcakes

Yield: 30 cupcakes

Ingredients:

  • 2 cups sugar
  • 1-3/4 cups all-purpose flour
  • 3/4 cup HERSHEY'S Cocoa
  • 1-1/2 teaspoons baking powder
  • 1-1/2 teaspoons baking soda
  • 1 teaspoon salt
  • 2 eggs
  • 1 cup milk
  • 1/2 cup vegetable oil
  • 2 teaspoons vanilla extract
  • 1 cup boiling water
  • For Cream Cheese Frosting
  • 16 oz. cream cheese (2 packages), softened
  • 1/2 cup unsalted butter (one stick), softened
  • 1 teaspoon vanilla extract
  • 2 1/2 cups powdered sugar, sifted
  • pinch of salt

Instructions:

  1. Line muffin cups (2-1/2 inches in diameter) with cupcake liners. Heat oven to 350°F.
  2. Stir together sugar, flour, cocoa, baking powder, baking soda and salt in large bowl. Add eggs, milk, oil and vanilla; beat on medium speed of mixer 2 minutes. Stir in boiling water (batter will be thin).
  3. Fill cupcake liners 1/4-1/3 full and place in a Cadbury Egg (thick side first) down inside batter.
  4. Top eggs with another 1-2 teaspoons batter.
  5. Bake 22 to 25 minutes. Cool completely. Frost. About 30 cupcakes.
  6. For Frosting:
  7. With an electric mixer, blend together cream cheese and butter until smooth.
  8. Turn mixer to low speed and blend in powdered sugar, salt and vanilla extract. Turn mixer on high and beat until light and fluffy. Tint with food colouring.
  9. Use immediately or refrigerate, covered, until ready to use. If refrigerated, the frosting will need to be brought to room temperature before using (after frosting softens up, beat with mixer until smooth).
  10. Pipe frosting unto cupcakes.

Share

Blogging Style + Big Fat Chocolate Cake

20130404-213442.jpg
Throwback Thursdays: Big Fat Chocolate Cake
Today’s a really late post, and a bit personal, and while I give you a throwback photo that’s not what this post is really about. I just got a new camera lens (score! Finally) and while I’ve only taken a few pictures with it, I got to thinking:

What’s my style of taking photos?

I go on many blogs and they have a signature style. A “if-I-saw-this-on-Instagram-I-would-know-it’s-you” style. Even if it’s not so distinct there’s a clear theme throughout the blog.

You have your overhead vertical shots:

20130404-214157.jpg
via La Tartine Gourmande

Then your large spaciously lit above photos:

20130404-214316.jpg
via Mowie Kay

And your classic background photos, which is what I strive for but don’t always get the right photo due to rushing:

20130404-214531.jpg
via Objectivo Cupcake

That’s when I realised I don’t have a consistent style. Most of the photos I take are usually rushed because of how busy my life is (which is a horrible excuse), so I’ve taken a stance to blog less in order not only to feel out my entire blog but to be able to take photos that I feel will appeal more. I know what I like, and there are photos like that on my blog, but not enough. I’m not your rustic background girl – I’m all colour, all for sunlight, all for props. However I am drawn to black backgrounds for certain foods.

I recently bought a mega load of new props so I will definitely be incorporating those. I probably won’t change what I blog about – but I do want to blog simpler items. That way I will be able to keep up on posts and I can use the extra time when I’m not stressing to post everyday to reflect on an overall blog theme. I’m sure I will look back 3 – 5 years from now and be happy I did. You may see me trying it out a few different styles, but I think in a matter of weeks I will get it right.

What’s your favourite blogging style on food blogs?

Share